The Uncommon Threads Adventure a.k.a. Getting Stitched in t.v. land
We’re back from our Uncommon Threads taping – none the worse for wear – although physically exhausted and mentally spent. As we were winging our way west, Clara and I kept pinching each other to see if it was real. We were utterly amazed that our childhood lessons of sewing and embroidery were getting us on the little screen. The anticipation of things to come kept us on our toes.
All our preparation of stitching just wasn’t enough. Since they had asked me to be on the show and since Uncommon Threads had started shooting, the DIY network had changed the way they wanted the show shot. What I was prepared for, wasn't what they now wanted. The first season of “Uncommon Threads” has just begun airing and evidently, probably to everyone’s amazement, they do seriously take viewers' comments to heart. What this meant is that there was no skipping of steps. Since we didn’t have enough step-outs pre-made to show all the steps of a particular project, a bunch of my projects got cancelled. I guess I understand but I was a little miffed after the hours I spent making everything.
The good thing about the people at Screen Door – the production company – was that they were all super nice and made us feel completely comfortable. We had our own producer named Judy Helm who walked us through our instructions a zillion times. We had a prop person – a lovely girl named Andry – who handed us things from the sidelines as we needed them. Judy had a friendly assistant producer named Molly Fitzgerald who gave us confidence and is one of the nicest women on the planet. The hostess Allison Whitlock, was so nice and friendly and she actually is very crafty herself. She knew how to embroider. She could anticipate what to say and point out about what we were demonstrating and she made us feel totally comfortable – as comfortable as you can be with fifteen people watching, directing, lighting, filming and more. I never did find out what they all did.
It took us two days to figure out we had a dressing room – which was pretty humorous. We kept changing in the bathroom. While we were there, two other groups were also filming – a crochet group from Atlanta and a weaving group from Colorado. They were really nice too – just as nervous and apprehensive – but they were troopers and they looked great on the monitors.
What was so amazing was how many people it took to make the whole thing come together and how long we had to film for a 22 minute show. We were filming for two and a half hours and it will all be edited and condensed. I will be interested to see what they used from the bits we filmed.
That’s it from here. If you want to read more about the “Uncommon Threads” filming experience, I recommend reading the blogs of Dharia and Sarah. They’ve done a good job of capturing their moments which were very similar to Clara's and mine. I forgot my camera so I can’t post any photos. The shows will air sometime in 2007 and I’ll try to find out when and post here.
My thought of the day for you all is... teach your kids to stitch, crochet, knit, paint, draw, and be generally crafty. You never know where it will lead them.
I’m going to take the next two weeks off to spend time with Julia and Mark, my mom and my sisters. I’ll be back in early September. Enjoy the rest of the summer!

Tuesday, August 22, 2006
Tuesday, August 15, 2006
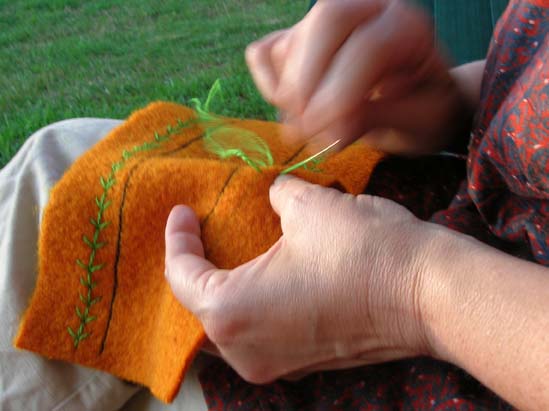 Picture by Julia
There has been a lot of this stitching action going on at the farm lately. Julia took this photo after I bribed her that I would put it on my blog. She has been looking at the same sight for hours upon hours, days upon days, lately. Still not finished and hoping I can get my needle on the plane - I've got hours to keep on working on the projects.
My friend Clara Lopez and I are off at 3 a.m. (you read it correctly) to get to the Hartford Airport. We are going to Burbank, California to be guests on “Uncommon Threads” -- some kind of new cable show on the DIY network. The shows will air sometime in 2007. Doesn’t that sound far away?
We are demonstrating nine projects – all from Colorful Stitchery - and taping three shows. Yikes. We are hoping for the best, not knowing what to expect. We’ll see.
Do you know what step-outs are? Neither did I until about a month ago. Now I am an expert in making things up to a certain point, and then starting all over again and remaking them up to the next point. All so that others may learn. What a lot of work.
No expectations. But I hope it helps the “embroidery” and “stitching” buzz. Wish us luck – we’re going to need it.
If you place an order, I will ship it out the beginning of the week of August 21. Thanks for your patience. Until next week.......
Sunday, August 13, 2006
The first bloom
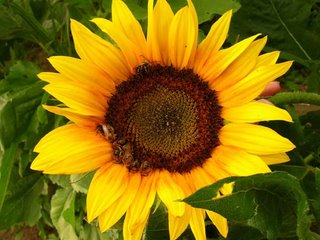 The first sunflower bloomed yesterday. I don't know if you can see, but when I examined the bloom, there were 10 bees down in the corner sleeping in it. You can imagine the buzzing activity that happens once the whole field begins blooming. One of our neighbors keeps honeybees and I assume these must be from her hives.
This sunflower is called Autumn Beauty - it's a colorful mix of blooms from yellow, orange, toffee, and dark reds that we buy from Johnny's Selected Seeds up in Maine. Johnny's has great varieties and their service is speedy.
Here's how the field looked not that long ago.
Sunflower Progress Report #1
Sunflower Progress Report #2
Thursday, August 10, 2006
Over the Top Socks
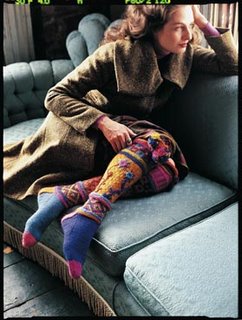 Last spring, Adina Klein, the Fashion Director at Vogue Knitting asked me if I was interested in doing a pair of socks for their Fall issue. "Yes, I would love to." I had had a sock idea in my head for awhile - a completely over the top mix of colorwork, duplicate stitch, Fair Isle, embroidery, pom poms and reverse stockinette stitch ridges. It started forming back when I made a swatch that no editor ever picked up. See that swatch here from my May 23rd post.
When you do one of these "designer challenges" the editors let you do whatever you want. I love that - I can pick the yarn. Of course, I picked my yarn Julia. And I don't have to tell them what I am doing - it's all a big surprise for them. (I guess they trust me.) I wanted the socks to look great and hoped that knitters would like them. I knit and embroidered these socks in four days straight (no home cooked meals here). The Farmer kept asking when they were going to be done. Finally, they were and I shipped them off and then hoped I would like the photo.
 The Vogue Knitting photo turned out better than I could have imagined. I love the dreamy quality of the model, the coat she is wearing, the sofa and the fringe trim on it. It might be a bit too moody to knit off but it sure does make me want to knit them.
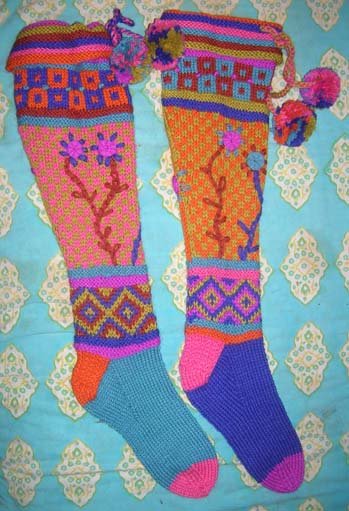
I am posting one of my lousy photos here which I took before I shipped the socks. I like to refer to photos when I am spiffing up my instructions and I no longer have the garment. This photo might be a little easier to knit from - not the moodiest but it shows the socks up close and personal. (I would have tried a little harder if I had know I would be putting them on a blog but at that point, I didn't know what a blog was.)
I knit them from the ankle up so that it would be easier to adjust for the calf shaping and length. Then I picked up the cast-on edge and knit the sock down like I normally do. They could just as easily be legwarmers if you want - just don't add the bottom sock portion. I picture wearing them with a short or long skirt, clogs or boots. They're a little heavy so they are definitley warm, winter socks.
One note - you can see the rib in the photo on the VK model but not in my photo. The idea is that the rib holds the socks up and the reverse stockinette stitch ridges would fold down over the ribs to cover them up. The pom pom decorated ties also help hold them up. Have fun!
If you make them, I'd love to see a photo - send me a jpeg via my e-mail.
 Last spring, Adina Klein, the Fashion Director at Vogue Knitting asked me if I was interested in doing a pair of socks for their Fall issue. "Yes, I would love to." I had had a sock idea in my head for awhile - a completely over the top mix of colorwork, duplicate stitch, Fair Isle, embroidery, pom poms and reverse stockinette stitch ridges. It started forming back when I made a swatch that no editor ever picked up. See that swatch here from my May 23rd post.
When you do one of these "designer challenges" the editors let you do whatever you want. I love that - I can pick the yarn. Of course, I picked my yarn Julia. And I don't have to tell them what I am doing - it's all a big surprise for them. (I guess they trust me.) I wanted the socks to look great and hoped that knitters would like them. I knit and embroidered these socks in four days straight (no home cooked meals here). The Farmer kept asking when they were going to be done. Finally, they were and I shipped them off and then hoped I would like the photo.
 The Vogue Knitting photo turned out better than I could have imagined. I love the dreamy quality of the model, the coat she is wearing, the sofa and the fringe trim on it. It might be a bit too moody to knit off but it sure does make me want to knit them.
 I am posting one of my lousy photos here which I took before I shipped the socks. I like to refer to photos when I am spiffing up my instructions and I no longer have the garment. This photo might be a little easier to knit from - not the moodiest but it shows the socks up close and personal. (I would have tried a little harder if I had know I would be putting them on a blog but at that point, I didn't know what a blog was.)
I knit them from the ankle up so that it would be easier to adjust for the calf shaping and length. Then I picked up the cast-on edge and knit the sock down like I normally do. They could just as easily be legwarmers if you want - just don't add the bottom sock portion. I picture wearing them with a short or long skirt, clogs or boots. They're a little heavy so they are definitley warm, winter socks.
One note - you can see the rib in the photo on the VK model but not in my photo. The idea is that the rib holds the socks up and the reverse stockinette stitch ridges would fold down over the ribs to cover them up. The pom pom decorated ties also help hold them up. Have fun!
If you make them, I'd love to see a photo - send me a jpeg via my e-mail.
Wednesday, August 09, 2006
Decorative Painting 1-2-3
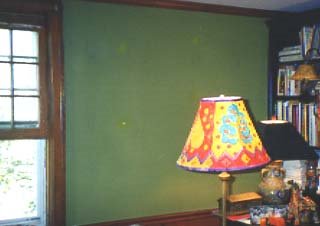
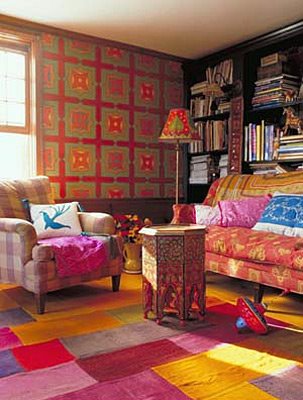
This is how our "library" looked in the Fall 2004 Issue of Country Home. The photo is by John Gruen. The styling was done by James Leland Day. Both of these really great guys worked with me four weeks prior to the C.H. shoot on the photography for Kids Embroidery. We were all happy to work together again when the Country Home editors came to photograph our farmhouse.

Before the shoot, my walls were a plain mossy green color - it was cosy and rich but I had always envisioned them in a kind of wallpaper-y looking design - reminiscent of William Morris and the marble floors in Venice. I didn't have enough money for the paper I desired so I took things into my own hands.
One week before the magazine shoot, in the middle of cleaning big time and throwing stuff away, I decided to transform the plain green walls into my vision.
 Here's how I did it.
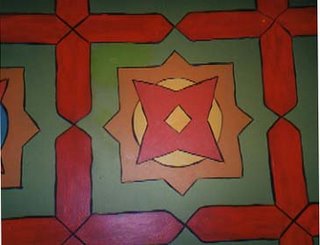
I looked at this book - Auguste Racinet's Full-Color Picture Sourcebook of Historic Ornament: All 120 Plates from "L'Ornement Polychrome," Series II
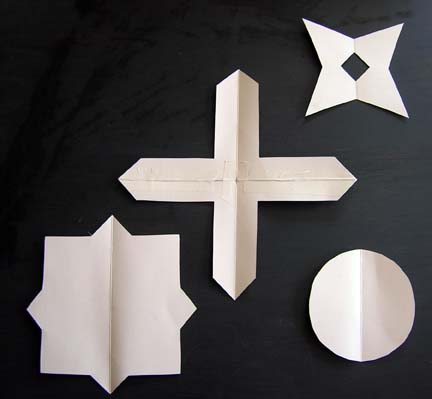
I made up a pattern I wanted to paint and then sketched it out roughly. I cut up some fedex envelopes to use as templates. I traced around the templates with a regular pencil as the layers of the pattern were built up. The paint covers the pencil lines.
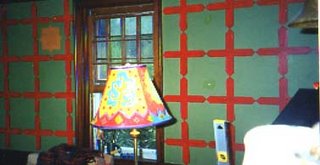
 I drew some vertical plumb lines using a level and then centered the cross on the plumb lines working out from one corner of the room. I traced around the cardboard "plus" pieces and then painted them with red latex paint from the paint store.
Next, I added the square with diamond eight pointed blocks in the center of each opening that resulted from the red + motifs. I traced around the template and then I painted these in a peachish shade freehand (that ended up going a little tan when viewed with the other colors). For all the other colors, I mixed small amounts of artists' latex paint - enough to finish each section of the wall as I went. Trust me, I wasn't sure how this all was going to work out. I just went with my instincts and hoped for the best.

Next, I added alternating circles of medium teal and yellow. On top of each circle, I added a x-ish shape in orange.
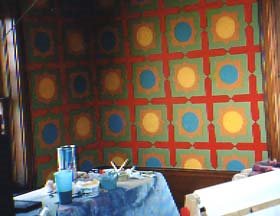
To finish the whole project off, I used a fine brush and black acrylic paint. I hand lined each shape to make them pop off the wall and make it all look more hand-done and artistic.
It took me two to three days of at least eight to ten hours a day to finish but I love it - as does Mark and Julia. It's vibrant and cozy at the same time. Luckily the ceilings are low and I didn't even need a ladder. Sorry the photos aren't so great. I just found them laying around and thought they might make a fun blog post. Three years ago, I never thought I would have a blog nor did I have a digital camera. My things have changed.
Please don't ask me to help you with your project..... I just don't have time. Just know that it's easy if planned out. Buy this book - Paint Recipes by Liz Wagstaff - it's great for faux finishes (although there isn't a lot about building patterns) - and figure out your own design. If you're nervous, figure it out on paper first and hang your painted sample on the wall. Look at it for a week and then decide if you like it enough to take the time to paint it.
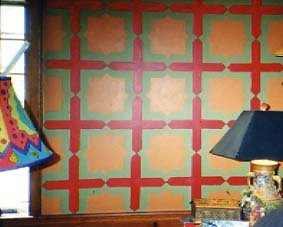
Remember, paint is cheap but the result can be wonderful. And if you're not happy with it, paint over it and try again. Here's what it looks like today. I still like it three years later and have no plans to change it for awhile.

This is how our "library" looked in the Fall 2004 Issue of Country Home. The photo is by John Gruen. The styling was done by James Leland Day. Both of these really great guys worked with me four weeks prior to the C.H. shoot on the photography for Kids Embroidery. We were all happy to work together again when the Country Home editors came to photograph our farmhouse.
Before the shoot, my walls were a plain mossy green color - it was cosy and rich but I had always envisioned them in a kind of wallpaper-y looking design - reminiscent of William Morris and the marble floors in Venice. I didn't have enough money for the paper I desired so I took things into my own hands.
One week before the magazine shoot, in the middle of cleaning big time and throwing stuff away, I decided to transform the plain green walls into my vision.
 Here's how I did it.
I looked at this book - Auguste Racinet's Full-Color Picture Sourcebook of Historic Ornament: All 120 Plates from "L'Ornement Polychrome," Series II
I made up a pattern I wanted to paint and then sketched it out roughly. I cut up some fedex envelopes to use as templates. I traced around the templates with a regular pencil as the layers of the pattern were built up. The paint covers the pencil lines.
 I drew some vertical plumb lines using a level and then centered the cross on the plumb lines working out from one corner of the room. I traced around the cardboard "plus" pieces and then painted them with red latex paint from the paint store.
Next, I added the square with diamond eight pointed blocks in the center of each opening that resulted from the red + motifs. I traced around the template and then I painted these in a peachish shade freehand (that ended up going a little tan when viewed with the other colors). For all the other colors, I mixed small amounts of artists' latex paint - enough to finish each section of the wall as I went. Trust me, I wasn't sure how this all was going to work out. I just went with my instincts and hoped for the best.

Next, I added alternating circles of medium teal and yellow. On top of each circle, I added a x-ish shape in orange.

To finish the whole project off, I used a fine brush and black acrylic paint. I hand lined each shape to make them pop off the wall and make it all look more hand-done and artistic.

It took me two to three days of at least eight to ten hours a day to finish but I love it - as does Mark and Julia. It's vibrant and cozy at the same time. Luckily the ceilings are low and I didn't even need a ladder. Sorry the photos aren't so great. I just found them laying around and thought they might make a fun blog post. Three years ago, I never thought I would have a blog nor did I have a digital camera. My things have changed.
Please don't ask me to help you with your project..... I just don't have time. Just know that it's easy if planned out. Buy this book - Paint Recipes by Liz Wagstaff - it's great for faux finishes (although there isn't a lot about building patterns) - and figure out your own design. If you're nervous, figure it out on paper first and hang your painted sample on the wall. Look at it for a week and then decide if you like it enough to take the time to paint it.
Remember, paint is cheap but the result can be wonderful. And if you're not happy with it, paint over it and try again. Here's what it looks like today. I still like it three years later and have no plans to change it for awhile.

Tuesday, August 08, 2006
News from the Farm
"GET AWAY FROM MY GARDEN!"
"GET AWAY FROM MY GARDEN!"
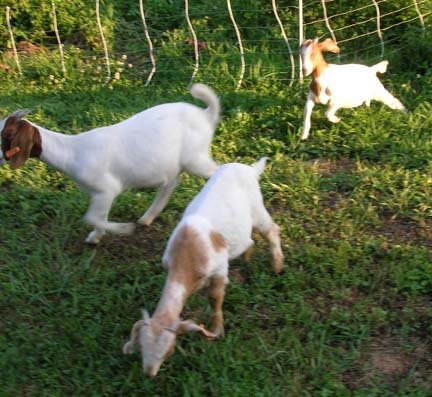
Goats are different than sheep, we're discovering. They can climb and they are very agile. They can stand on two feet and eat leaves from trees. They can escape an electric fence and aren't afraid to try. They like my flowers and veggies (who wouldn't). I'm not so sure about this new animal.
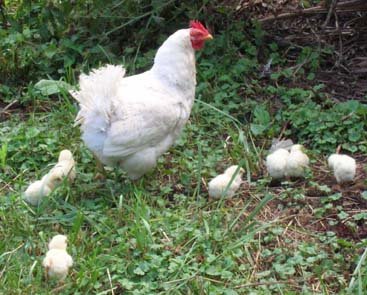 My "Partner in Swine" and the Pig Farmer's wife discovered this brand new batch of eight chicks and their very protective Mama Hen. Aren't they just the cutest? It's been about three years since something has hatched naturally on this farm. Sure will be fun to watch them grow.
Monday, August 07, 2006
 Geraniums
I love them. I used to despise them - the smell, the look. They reminded me of flowers in front of the stones in graveyards. They were too commonplace.
But then something changed - I noticed how the flowers danced above the foilage. I started liking all the garish colors. I started to notice their depictions in art and fabric design. I saw photos of them blooming unabashedly on the Greek Isles. I discovered the varieties with multi-colored leaves. And then, best of all, I found I could put them in pots and they didn't need much tending or watering. Suddenly, they were the plant for me. I bought these at Walker Farm up in Dummerston, Vermont. (If you're close, definitely a destination to travel to if you are a gardener.)
 I over-winter them in my studio and they bloom all winter long. I pick the flowers and put them in bouquets in the kitchen when it is dreary and cold. Right now, I've got pale pink (for Julia), salmon, and and a hot coral. They make me happy all year.
I love geraniums now. It's funny how your taste changes over the years. But it does.
Sunday, August 06, 2006
Sunflower Update - Early August 2006
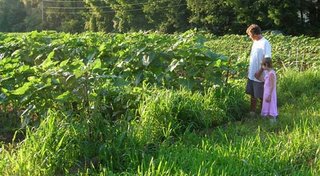
We went down to check on the sunflowers. You can see how high they are as compared to Mark who is about 5'9" tall. I think we will have a first bloom this week.
 This photo shows the ones that were germinating in this post. They've got a long way to go and we think they may be a little stunted. It's a little too wet where we plant them. But at least there are a lot of leaves. I know they will eventually bloom.

We went down to check on the sunflowers. You can see how high they are as compared to Mark who is about 5'9" tall. I think we will have a first bloom this week.
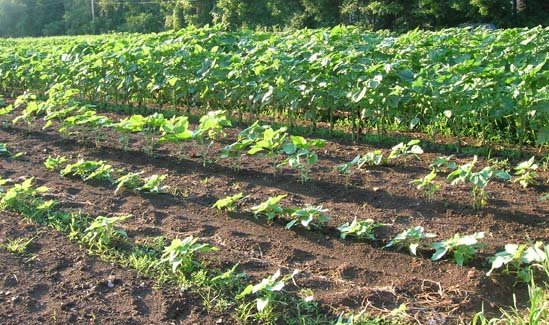 This photo shows the ones that were germinating in this post. They've got a long way to go and we think they may be a little stunted. It's a little too wet where we plant them. But at least there are a lot of leaves. I know they will eventually bloom.
Friday, August 04, 2006
Next Up from Interweave Knits Fall 2006 Issue
 I finally got my Fall 2006 issue of Interweave Knits Magazine last night. I thought it would never come. I've been hearing from folks about my editorials and still hadn't seen what they looked like. The issue looks varied and interesting with lots of adventurous projects. I can't wait to read the article about Annie Modesitt. I have known Annie for probably almost twenty years. Yikes! When I went to the June TNNA show in Columbus I ran into her again and caught up. It's nice to see her featured. She works so hard and has an interesting take on the craft of knitting. And by the way, we both knit "backwards" (that's my term) or as she calls it "combination knitting." I taught myself to knit from a book one weekend - that's how my "problem" happened. How's that for following directions - all my purl stitches are twisted but as I now know - I just do it a little differently than most. It hasn't ever slowed me down.
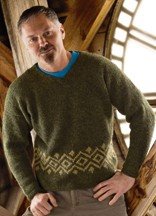
Like I said in this post, I did three sweaters for this issue. (Thanks for the work Pam!) This man's sweater called the "Spartan Pullover" is the easiest of the three and I would say maybe the easiest in the entire issue. Now that's funny, one of my designs being one of the easiest in the entire magazine. I think that's good so some of you beginners out there might actually knit it.
Here's my take on the sweater and the yarn. Kerry knit up at a surprising gauge of 3 1/2 sts/inch. When I looked at the balls of Tahki's Kerry - I was guessing more like four but it is lofty and has lots of air. I think a guy would like wearing a sweater of this yarn because it isn't very dense and heavy. I could envision The Farmer wearing it inside and not being too hot.
I put the Fair Isle design in the bottom of the design. It was knit in the round up to the armholes and then the front and back were worked back and forth separately. The reason for this is so that when you are knitting the Fair Isle Pattern in the round, you'll only have to concentrate on the colorwork - all the knitting is done in knit stitch. This makes it way easier for a beginner to master. Make sure you carry the yarn not being knit with very loosely across the back of the work or it will pull in and distort the rest of the sweater. If you find this is happening, go up a needle size.
Pam wanted a v-neck (I had envisioned a t-neck) because guys don't like scratchy wool at their necks (she's right). Except for the v-neck and underarm shaping - this is a straight forward sweater. It looks a little short on the man wearing it. I don't know if he was particularly tall - maybe. I did the length I always do for men. So check your guy's length (or a favorite sweater) in case you want to adjust. (By the way, when you design for magazines, you make the size sweater they request. They don't usually know who will be modeling the sweater so the fit is a total crapshoot. It's especially hard with men's and kid's sweaters.)
If you just want to knit a plain v-neck pullover at a quick gauge, leave out the Fair Isle design. It will fly off your needles at this loose gauge.
More next week on the last Interweave Knits design.
Photo by Chris Hartlove.
 I finally got my Fall 2006 issue of Interweave Knits Magazine last night. I thought it would never come. I've been hearing from folks about my editorials and still hadn't seen what they looked like. The issue looks varied and interesting with lots of adventurous projects. I can't wait to read the article about Annie Modesitt. I have known Annie for probably almost twenty years. Yikes! When I went to the June TNNA show in Columbus I ran into her again and caught up. It's nice to see her featured. She works so hard and has an interesting take on the craft of knitting. And by the way, we both knit "backwards" (that's my term) or as she calls it "combination knitting." I taught myself to knit from a book one weekend - that's how my "problem" happened. How's that for following directions - all my purl stitches are twisted but as I now know - I just do it a little differently than most. It hasn't ever slowed me down.
Like I said in this post, I did three sweaters for this issue. (Thanks for the work Pam!) This man's sweater called the "Spartan Pullover" is the easiest of the three and I would say maybe the easiest in the entire issue. Now that's funny, one of my designs being one of the easiest in the entire magazine. I think that's good so some of you beginners out there might actually knit it.
Here's my take on the sweater and the yarn. Kerry knit up at a surprising gauge of 3 1/2 sts/inch. When I looked at the balls of Tahki's Kerry - I was guessing more like four but it is lofty and has lots of air. I think a guy would like wearing a sweater of this yarn because it isn't very dense and heavy. I could envision The Farmer wearing it inside and not being too hot.
I put the Fair Isle design in the bottom of the design. It was knit in the round up to the armholes and then the front and back were worked back and forth separately. The reason for this is so that when you are knitting the Fair Isle Pattern in the round, you'll only have to concentrate on the colorwork - all the knitting is done in knit stitch. This makes it way easier for a beginner to master. Make sure you carry the yarn not being knit with very loosely across the back of the work or it will pull in and distort the rest of the sweater. If you find this is happening, go up a needle size.
Pam wanted a v-neck (I had envisioned a t-neck) because guys don't like scratchy wool at their necks (she's right). Except for the v-neck and underarm shaping - this is a straight forward sweater. It looks a little short on the man wearing it. I don't know if he was particularly tall - maybe. I did the length I always do for men. So check your guy's length (or a favorite sweater) in case you want to adjust. (By the way, when you design for magazines, you make the size sweater they request. They don't usually know who will be modeling the sweater so the fit is a total crapshoot. It's especially hard with men's and kid's sweaters.)
If you just want to knit a plain v-neck pullover at a quick gauge, leave out the Fair Isle design. It will fly off your needles at this loose gauge.
More next week on the last Interweave Knits design.
Photo by Chris Hartlove.
Thursday, August 03, 2006
A Gift from Pennsylvania
When you write books, you work, work, work, work on them. Your friends ask you what’s going on and you say “I’m working on my new book.” Pretty soon, they stop asking you. They know your answer. At first, it seems intriguing to them – someone working on a book. But it gets boring pretty quick. “How could it take someone so long to do something” they wonder silently to themselves. It is all so personal – the research, the planning, the futzing around with ideas. If it’s a how-to book, there are lots of projects to buy supplies for, plan, make, and then make again. Then there are the instructions to write hoping someone understands what you mean. It’s difficult to understand that it could take someone so long to produce a book. But trust me, it does.
After I turn the stuff in, then I wait for the editorial process to happen. That could take months (it usually does). I talk with the editor, proof it as they ask me to, look at bluelines. I hope the pictures turn out as I envisioned them in my head so long ago. It is a tedious, long process. Then it gets sent to the printer and I wait again – usually about three months. By the time the book comes out, I’m usually into the next project. Sometimes I barely look at it. I hope I don’t find a mistake. I cringe at things I don’t like – photos, cropping, mis-placed type, bad color. I know how good it could have been. Then I move on. These are just the honest facts of writing a book. It’s a process.
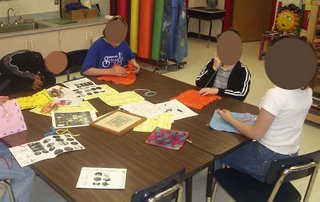
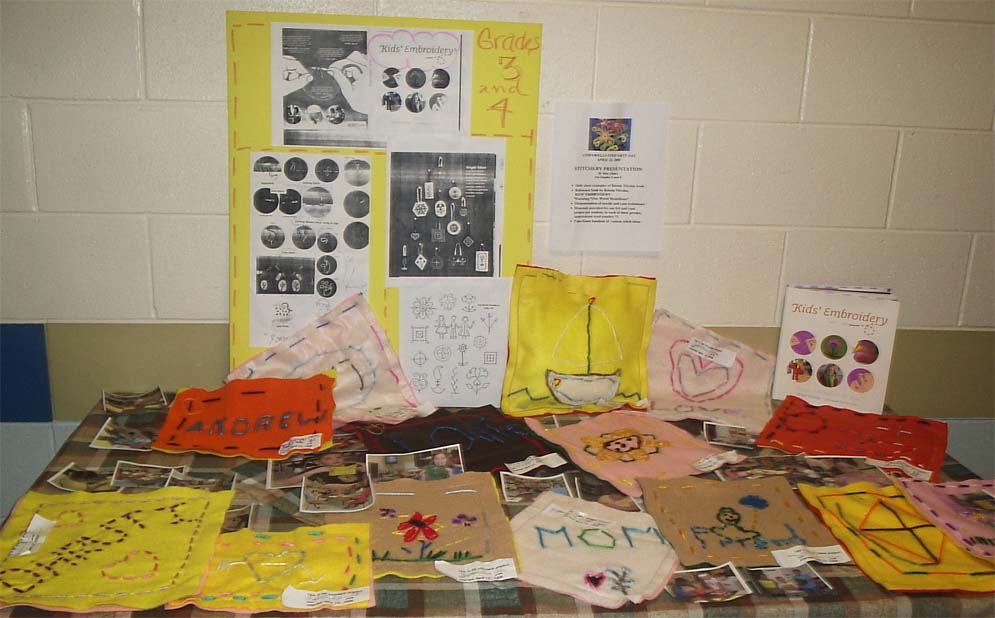
 Sometimes, good things happen -- like the other day when the Fedex guy came to deliver a package from Pennsylvania. I opened the envelope after a long day of Julia being sick and inside was a CD. We plunged it into my computer and up popped seventy pictures of school kids from Pennsylvania. Back in January, Patricia Orner, an elementary school art teacher asked me if she could use my website and my book Kids Embroidery as inspiration for some of the art projects she was doing with her students. “Sure,” I answered. And promptly forgot about it.
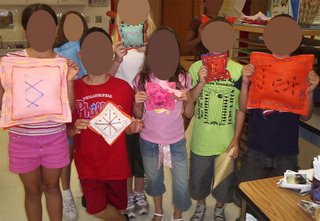 On the ribbon wrapped CD were oodles of photos of third and fourth graders from the Cornwells Elementary School with embroidery projects. Patricia had shown them lots of my art – my paintings, my stitchery, photos from the different home magazines featuring my painted walls and still life in my home. The CD was full of images of kids with giant smiles on their faces (the principal, for privacy purposes, wouldn’t let me show the kids' faces on my blog – I don’t blame him). There were photos of kids stitching and of the display they had at their art fair. These are just a few of them.
 It made me cry. Julia was impressed. Those kids I didn’t know from far away took my ideas and ran with them. They had fun. They stitched. They designed. They are marvelous!
Thanks so much to Patricia for making “my job” worthwhile. I like when I “get to” someone – when what I do resonates with them. I hope her school and the parents and kids appreciate her talent. It’s rare.
There’s still time left in the summer to teach your kids or friends to stitch! Try it – you may surprise yourself!
When you write books, you work, work, work, work on them. Your friends ask you what’s going on and you say “I’m working on my new book.” Pretty soon, they stop asking you. They know your answer. At first, it seems intriguing to them – someone working on a book. But it gets boring pretty quick. “How could it take someone so long to do something” they wonder silently to themselves. It is all so personal – the research, the planning, the futzing around with ideas. If it’s a how-to book, there are lots of projects to buy supplies for, plan, make, and then make again. Then there are the instructions to write hoping someone understands what you mean. It’s difficult to understand that it could take someone so long to produce a book. But trust me, it does.
After I turn the stuff in, then I wait for the editorial process to happen. That could take months (it usually does). I talk with the editor, proof it as they ask me to, look at bluelines. I hope the pictures turn out as I envisioned them in my head so long ago. It is a tedious, long process. Then it gets sent to the printer and I wait again – usually about three months. By the time the book comes out, I’m usually into the next project. Sometimes I barely look at it. I hope I don’t find a mistake. I cringe at things I don’t like – photos, cropping, mis-placed type, bad color. I know how good it could have been. Then I move on. These are just the honest facts of writing a book. It’s a process.
 Sometimes, good things happen -- like the other day when the Fedex guy came to deliver a package from Pennsylvania. I opened the envelope after a long day of Julia being sick and inside was a CD. We plunged it into my computer and up popped seventy pictures of school kids from Pennsylvania. Back in January, Patricia Orner, an elementary school art teacher asked me if she could use my website and my book Kids Embroidery as inspiration for some of the art projects she was doing with her students. “Sure,” I answered. And promptly forgot about it.
 On the ribbon wrapped CD were oodles of photos of third and fourth graders from the Cornwells Elementary School with embroidery projects. Patricia had shown them lots of my art – my paintings, my stitchery, photos from the different home magazines featuring my painted walls and still life in my home. The CD was full of images of kids with giant smiles on their faces (the principal, for privacy purposes, wouldn’t let me show the kids' faces on my blog – I don’t blame him). There were photos of kids stitching and of the display they had at their art fair. These are just a few of them.
 It made me cry. Julia was impressed. Those kids I didn’t know from far away took my ideas and ran with them. They had fun. They stitched. They designed. They are marvelous!
Thanks so much to Patricia for making “my job” worthwhile. I like when I “get to” someone – when what I do resonates with them. I hope her school and the parents and kids appreciate her talent. It’s rare.
There’s still time left in the summer to teach your kids or friends to stitch! Try it – you may surprise yourself!
Wednesday, August 02, 2006
Mystery Solved - An Embroidered Cloth from Uzbekistan
Before Julia was born, I used to go to do a lot of antiquing. It’s getting a little easier to do again, now that she is older. I try to introduce her to old things, stop her from touching too much, pray that she doesn’t break anything. The grim facts are – it’s more fun when I can poke around on my own at my own pace. One day...... then I’ll miss her.
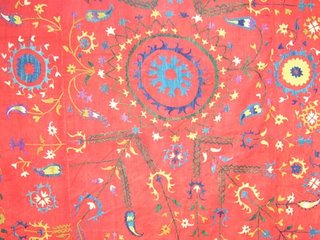
 I found this embroidered cloth at a NY Pier Antique Show about ten years ago. A man had it all rumpled up into a little ball stashed on his table. What got me was the colors – it was beautiful. I mostly am attracted to antiques for the colors they are - kind of a funny way to make a collection. I have ended up with lots of things that have no particular theme except for bright colors and pretty patterns.
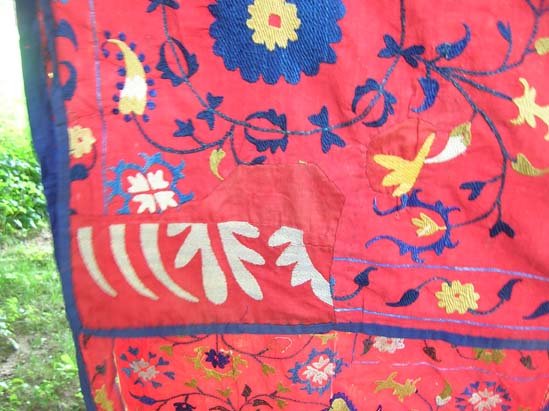
I bought the cloth for what I thought was a good price not knowing what it was or where it came from. It is made out of red cotton fabric and hand-embroidered in hand-dyed silks with two stitches – a variation of outline (or stem) stitch and a little bit of chain stitch. It is huge – big enough to cover a bed. It has been well used. All over the cloth are little whip-stitched patches where the fabric has torn. Someone, somewhere stitched over them by hand in a sloppy fashion. There are even sections that are missing (last photo) where another hand-embroidered piece has been inserted. The cloth was definitely made in sections and then sewn togther by hand with the pieces not matching. I can’t imagine how long this would have taken someone to stitch.
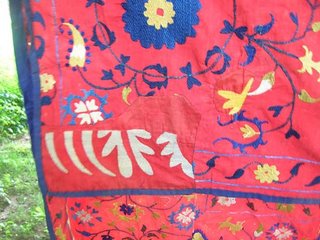 In the new issue of Piecework (July/August 2006), I was so happy to see a similar cloth on the cover of the magazine and to find a very good article inside by Pamela D. Toler entitled Suzanis – The Flower Cloths of Uzbekistan. All of the cloths shown are on white ground fabric so I am still a little perplexed by mine. The author tried to do a lot of research on cloths she purchased in Turkey recently but there honestly wasn’t a lot published. I did learn that cloths such as mine were dowry pieces that would have been stitched by a young girl and then saved until her marriage. Most were considered heirlooms. Most of the embroideries shown have more symmetry than mine But they have similar, related looking motifs. Pick up the magazine if you are interested.
 Suzanis are quite the thing in interior decorating right now. Many swanky magazines such as House and Garden and The World of Interiors recently have featured bed coverings of embroidered suzanis. I always wonder if these are the homeowner's textiles or if the magazine's stylist just brought them in for the shoot.
What I really enjoy about my cloth is the wild, joyful patterning of the leaves, vines and flowers. I love the exuberant red ground color which makes the motifs pop. I like that every place I look, there are different colors and different flowers. I like the patches and little hand-sewn tears. It all has a history I will never know about – just wonder.
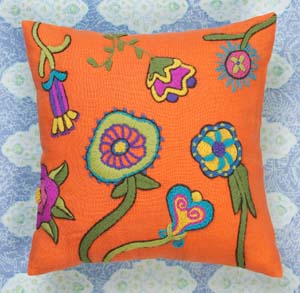 I didn’t realize it, but one of the pillow kits I designed for JCA has a similar feel. Not a big surprise though. Quirky Crewel is stitched in wool on an orange linen fabric. The colors I used are more contemporary – lime green, purples, fuschia, turquoise, sunflower yellow. This design uses lots of stitches and is really fun to make. It is one of the most popular designs and a great piece to try if you are interested in learning a lot of different stitches.
One of my long-ranging goals is to stitch enough similar feeling linen fabric to have a wing chair covered in it. I’ve got a special chair in my kitchen which we call "the throne" or "Pop’s chair" (my dad used to sit in it when he came to visit). Every time I look at it, I think of it covered in exuberant crewel work. Now when will I ever get to that? I’ll need about six yards of fabric. I’d better start stitching soon.
Before Julia was born, I used to go to do a lot of antiquing. It’s getting a little easier to do again, now that she is older. I try to introduce her to old things, stop her from touching too much, pray that she doesn’t break anything. The grim facts are – it’s more fun when I can poke around on my own at my own pace. One day...... then I’ll miss her.
 I found this embroidered cloth at a NY Pier Antique Show about ten years ago. A man had it all rumpled up into a little ball stashed on his table. What got me was the colors – it was beautiful. I mostly am attracted to antiques for the colors they are - kind of a funny way to make a collection. I have ended up with lots of things that have no particular theme except for bright colors and pretty patterns.
I bought the cloth for what I thought was a good price not knowing what it was or where it came from. It is made out of red cotton fabric and hand-embroidered in hand-dyed silks with two stitches – a variation of outline (or stem) stitch and a little bit of chain stitch. It is huge – big enough to cover a bed. It has been well used. All over the cloth are little whip-stitched patches where the fabric has torn. Someone, somewhere stitched over them by hand in a sloppy fashion. There are even sections that are missing (last photo) where another hand-embroidered piece has been inserted. The cloth was definitely made in sections and then sewn togther by hand with the pieces not matching. I can’t imagine how long this would have taken someone to stitch.
 In the new issue of Piecework (July/August 2006), I was so happy to see a similar cloth on the cover of the magazine and to find a very good article inside by Pamela D. Toler entitled Suzanis – The Flower Cloths of Uzbekistan. All of the cloths shown are on white ground fabric so I am still a little perplexed by mine. The author tried to do a lot of research on cloths she purchased in Turkey recently but there honestly wasn’t a lot published. I did learn that cloths such as mine were dowry pieces that would have been stitched by a young girl and then saved until her marriage. Most were considered heirlooms. Most of the embroideries shown have more symmetry than mine But they have similar, related looking motifs. Pick up the magazine if you are interested.
 Suzanis are quite the thing in interior decorating right now. Many swanky magazines such as House and Garden and The World of Interiors recently have featured bed coverings of embroidered suzanis. I always wonder if these are the homeowner's textiles or if the magazine's stylist just brought them in for the shoot.
What I really enjoy about my cloth is the wild, joyful patterning of the leaves, vines and flowers. I love the exuberant red ground color which makes the motifs pop. I like that every place I look, there are different colors and different flowers. I like the patches and little hand-sewn tears. It all has a history I will never know about – just wonder.
 I didn’t realize it, but one of the pillow kits I designed for JCA has a similar feel. Not a big surprise though. Quirky Crewel is stitched in wool on an orange linen fabric. The colors I used are more contemporary – lime green, purples, fuschia, turquoise, sunflower yellow. This design uses lots of stitches and is really fun to make. It is one of the most popular designs and a great piece to try if you are interested in learning a lot of different stitches.
One of my long-ranging goals is to stitch enough similar feeling linen fabric to have a wing chair covered in it. I’ve got a special chair in my kitchen which we call "the throne" or "Pop’s chair" (my dad used to sit in it when he came to visit). Every time I look at it, I think of it covered in exuberant crewel work. Now when will I ever get to that? I’ll need about six yards of fabric. I’d better start stitching soon.
Subscribe to:
Posts (Atom)
-
Hi All! A quick note to let you all know that I'm now writing a Newsletter over on Substack: Kristin Nicholas' Colorful Newsletter f...
-
 Jane Brocket is an internet crush of mine. Her Yarnstorm was the first blog I stumbled upon many years ago. I didn't know what a blog...