Showing posts with label decorative painting. Show all posts

Thursday, August 16, 2018

Creative Retreat #2 - 2018 Day One Furniture Painting

I hosted another great "Getting Stitched on the Farm" Creative Retreat this past weekend. This weekend's class featured one day of Furniture Painting - inspired by the Bloomsbury Table project in my new book Crafting A Patterned Home


Each student brought their own small piece of furniture painted in a base coat. The day was spent figuring out how they want to decorate their table and then doing it. I supplied many colors of latex paint. 


Here are their projects before they were attacked with pattern and color. 


Here the students are cutting paper, making sketches and figuring out how to work with their individual pieces of furniture. 


Jan looks to be in intense concentration. 


Now I will share photos from each person's project as the day progressed. 

Stephanie's project was a navy blue wooden tray. You can see her original sketches and how the design progressed over the day. We used hair dryers to speed the drying. 


This is Stephanie's tray at the end of the day. She has further plans to add lines and shading to the flowers and decorate the sides of the tray with stripes and polka dots. 


Cheryl brought a sweet little side table. She designed a water lily motif. She lives on a lake and is painting a room with a mural of undersea designs. She used sponges to create the texture. 


Here is the side of Cheryl's table with Jan poking her face through. Doesn't Jan look like she is having a blast? 


The finished top. She took the table home and will be coating it with some polyurethane to seal it. 


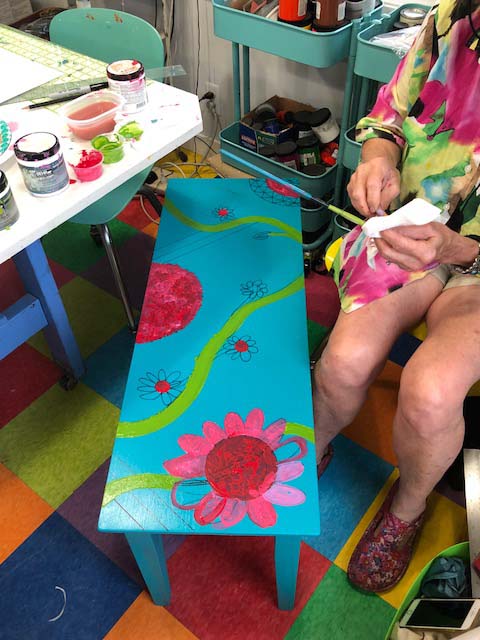
Gail's project was a colorful bench for her granddaughters. Gail is an author and has a hand-dyeing business called the The Kangaroo Dyer. I love how her design is reminiscent of the mottled colors that her yarn is dyed in. And it is bright and cheerful like Gail. 


Gail plans to add some glitter and sparkly bits which I can only imagine will make the bench a favorite place for her granddaughters to sit when they visit. Someone in the class named it "The Sisters Bench."  

Jan who came the furthest - all the way from West Virginia. She has an antique store and also sells painted furniture. She brought a cute little side table. Here are her process photos. Her design was inspired by a rug she saw at a hotel. In order to fit the motif onto the oddly shaped table, we cut a pattern to fit it. She has more work to do on it when she gets home including outlining the shapes and adding more dots and spots. 


We enjoyed a gorgeous lunch cooked by friend Cynthia. 


The tablecloth is made from one of my fabric designs. You can purchase a tablecloth made by the folks at Roostery (a division of Spoonflower) here. The fabric design is available in my Spoonflower shop here. You can purchase the design printed on 26 different fabrics, 2 types of wallpaper and gift wrap.  


It was a great day of sharing ideas and stories. I love hosting these retreats because even though each student comes knowing none of the others, by the end of the day they are all friends. For me, it is so rewarding to see the projects and each person's confidence develop as the day goes on. And meeting fellow creative spirits who are brave enough to come to our farm is one of the best parts of each year here at our farm - at least for me (maybe not my family :) ). 


Friday, May 18, 2018

Sew Much More Podcast with Ceil Diguglielmo + Kim's Chairs

I was delighted to be asked to be on the "Sew Much More" Podcast hosted by Ceil Diguglielmo. Ceil has been a maker of window treatments and began her podcast a few years ago as a way to branch out beyond just making. She is a great conversationalist and we had a fun chat. We talked about all kinds of things. It is a bit of a long episode - maybe I talked too much. Here is the link to the episode

You can check out all her podcast interviews on her site here. Thanks so much Ceil for helping to spread the word about my work. I was especially excited to be on this podcast because I would be reaching a whole new group of folks who do not know anything about what I do. The nice thing though is they are all very into fabric and design and so they might be interested in the things I am doing now. 


In other news, my friend Kim from Kim's Upsholstery is doing up a set of Victorian chairs. She purchased my new Mod Suzani Fabric for the upholstery. Here is a link to Kim's YouTube Channel where you can find many amazing DIY videos. Kim painted the chairs with a paint line I had never heard of called Debi's Design Diary's DIY Paints. There are so many great women out there doing interesting things - aren't there? 


Here is a small picture of the Mod Suzani Fabric that I designed and Kim will be using. You too can purchase it on over 25 types of fabric, wallpaper and gift wrap over on my Spoonflower shop here

Hope to see some of you at the Webs Tent and Fleece Sale in Northampton tomorrow. The event happens rain or shine.  I will be set up with our local lamb. I will be bringing my books and other products with me but if it starts raining like crazy, I will put them away - books, paper and rain do not do good together. 

Tuesday, May 01, 2018

My Handpainted Library "Wallpaper" in Photos

Happy May Day everyone! Only a few days until the Crafting A Patterned Home Book Launch Party here at our antique farmhouse. I hope to see some of you here. Photographer Rikki Snyder will be here too to greet you. And I have some friends helping out too. Here is the Eventbrite site for more information. It is FREE. Books and some other things will be for sale (hint, hint - Mother's Day is coming.) You do not need a ticket but I thought it would give me an idea if anyone is coming

You all have seen the cover of my new book Crafting A Patterned Home. It features the handpainted wallpaper I did back in 2003. This was before I had a digital camera and before this blog (which BTW started in 2006). But I did have a regular camera and amazingly so - I documented the steps of handpainting the wallpaper. Please excuse the lousy photos - they will help you get the idea. 

I'm not a fan of stenciling - although I know many people love to stencil. I've tried it but the paint always seeps under the stencil and I have a real mess. My handpainting technique is kind of the opposite of stenciling. I use cardboard templates and with a pencil, trace the templates directly on the wall. Here are the templates I made out of Fedex envelopes.


Here is the room before the painting began. 


I began at the corner of the room and traced the center cross along two walls. Then I filled them all in with red paint. 


Next I took the largest shape - the square with the points coming out four sides and traced that in the center of each opening created by the crosses. I painted them an apricot color.


Next I traced the circle motif inside each large square. I painted them in alternating shades of butter yellow and turquoise.


Lastly I added a pointy cross shape to the center of each circle in a pretty orange shade. After all the colors were laid on, I outlined the shapes in black with a small liner brush. 


Here is the room completed. All the directions and templates are in my new book Crafting A Patterned Home. I know my color choice may be too out there for most but with a little experimentation, you can develop your very own colorway. 


In addition, you can find a digital version of this wallpaper design available as wallpaper, fabric or giftwrap in my Spoonflower shop here. It comes in two sizes - as seen here and at half scale

Thursday, July 21, 2016

Lampshade Painting/Fabric Printing Retreat 2016 - Day Two

Wow - the past weekend was certainly a whirlwind. Day One of the first Creative Retreat here at our farm went great. Day Two was Lampshade Painting Day. I had never taught this class so I wasn't sure how it would go. The first time teaching any new subject is always a bit of an experiment - kind of like doing a craft for the first time. 

I must say, I think it was successful. Although there was a whole lot packed into the day, almost everyone finished their lampshade. If they didn't, I sent them off with paint and the where with all to finish. 

It is always so amazing to me how each project made differs so much in the end. That is how it is with individual art making - you see the personality of the artist coming out - even if they are not very experienced at painting or making. 

Here are photos from the first half of the day. Students had to plan their lampshades and then begin. Blank canvas fear for sure but I could slowly see their confidence increase and they began relaxing into the brush and the paint and the creativity. 


Some of the lampshades I have painted for inspiration amongst the jumble of the studio. 


Everyone is working away - deep in concentration. 


They barely wanted to stop for lunch. We decided to take a photo of the half way mark in front of my shed. 


And then they got loopy! 


Lunch was awesome - thanks to my friends Cathy and Cynthia who were helping for the weekend. 


All afternoon, everyone painted their heart out. It was a race to finish. Perhaps next time I will suggest smaller shades but truth be told, I think no matter how long they had or what size lampshade, I still think it would have been tough to finish. 


Here are the finished and almost finished lampshades. Aren't they fantastic? 


Here are a few more views. 


I'm hoping everyone will send a photo of their shade in their home. That would be fun. I am so proud of all the students. What a great day and such good work and art made. 

I will definitely be teaching this class again next year. To find out when, make sure you sign up for my newsletter at the top right of the sidebar. 

FYI: On July 30th I have the second Fabric Printing Day here at the farm. There are still 3 spaces available if you are interested. The price is $250 for the day and it includes morning food, full farm lunch, and all supplies. More info here to sign up. If you have any questions, please send them on to kristinnicholasATgmailDOTcom. There is an Add-on Day too which is Crewel Embroidery for $160.

Kristin Is Now Writing Over on Substack

Hi All! A quick note to let you all know that I'm now writing a Newsletter over on Substack: Kristin Nicholas' Colorful Newsletter f...