Showing posts with label gardening. Show all posts

Friday, June 12, 2020

Mahboubeh, Persian Tulips, and Lamb and Rhubarb Stew

I am re-posting this story here today. It was originally published on May 14, 2011. It is rhubarb season here at the farm and at this time of year, I try to make this recipe for Persian Lamb and Rhubarb Stew. The recipe comes with a pre-amble which it seems I used to have more time to do. 

The rhubarb in my garden is at its peak right now and I am going to make this for dinner this weekend. 

Originally published May 14, 2011

When I was in high school, my family hosted an exchange student for a year from Iran named Mahboubeh M-M. It was 1976 when Iran still was ruled by The Shah and before the Iranian Revolution and Hostage Crisis and the start of ABC's Nightline. It was one of those life-changing experiences for both Mahboubeh and my entire family. She couldn't speak a word of English, was a practicing Muslim, and she had never looked a man in the eyes. I can only imagine how scary it was for her to arrive in the U.S. We shared a room where she immediately figured out which wall was the East side of the room. She put on her hijab, lay down on her prayer mat and prayed what my 17 year old brain thought was all day long. The year with Mahboubeh was an awakening for me. Although I can easily admit that I wasn't always happy with my "new sister" reigning in on my senior year in high school, I now look back on it as to the year my life began to grow past my small town upbringing. The world is a large place full of different religions, morals, foods, and cultures and although we don't always get along with everyone, it is vital to remember that people all over the world are basically the same. They love their families and friends, are proud and fierce over the safety, health and love of their children, and have hometown pride.

The year with Mahboubeh awakened my family to Persian food. I grew up eating pretty bland typical 1970's fare. Food was always important to us even if it wasn't "gourmet." One of us was always baking some kind of sweet thing. German food was about as exotic as we got due to my German Grandmother Frieda's influence. Food was the way Mahboubeh was able to bond with us and become part of the family. She had never cooked before but had obviously watched her mom. She missed the spices and meals she had always eaten and my mom gave her the opportunity to learn to cook and share her country's food with our family. In town there was a Doctor Minoui who was Iranian. His wife took Mahboubeh under her wing, sharing Persian recipes. Soon Mahboubeh was cooking stews, sweets and our very favorite Persian dish - a potato-crusted rice called Tadik. Mom began buying saffron and the exotic spices wafted through our house every weekend. Mahboubeh's cooking adventures were the secret to her learning English and becoming part of our family. By Christmas, she could speak English quite well and we all settled into a typical family routine. Dad was in love with her cooking but I don't think she was ever brave enough to look him in the eye.


Mahboubeh returned to Iran after her year in Dover but not for long. She returned to the States, went to university in Houston, married a fellow Iranian, and had three children. She is a pharmacist and still comes to visit us for family rites of passage. Her daughter Shandiz has come to New England for extended vacations and is great friends with my older nieces and nephews. 

1976, The Year of the Mahboubeh, had an everlasting effect on all of us. It was the year I became more aware of foreign lands, foods and exotic motifs and textiles. My mom has passed on many of the gifts Mahboubeh's family sent to us including woolen shawls and metal serving trays. I treasure all of them and frequently use them as props in my photos.  


As I travel through my life, I frequently think back on that important year when my life opened up to all things Persian. In my gardening life, I discovered a love of tulips only to later find out that they grow as wildflowers in Iran. Although I can't grow them here at the farm like Jane can (the deer and sheep think they are lollipops), I do have a few little bulbs that somehow persevere every year despite complete neglect. They are called Flaming Parrot Tulips and this year I beat the critters, plucked them from the garden and have been enjoying them in a vase all week long. My kind of show - frilly, colorful, and over the top!


And now onto the recipe of the week. Always looking for interesting ways to cook lamb, I stumbled upon an odd recipe in a small paperback book called Persian Lamb and Rhubarb Stew. This week with the arrival of the yearly rhubarb harvest, I decided to give it a go. I ended up changing it up completely. With the help of my friend Kay, I turned it into the recipe below. Although it seems a mighty odd combination, upon googling "lamb rhubarb" you will find that it is a classic combination. 


My advice is to let the stew sit for a couple of days because it sure does improve with age. And make sure you use golden raisins - otherwise the stew will look like there are lamb pellets in it! (Most likely only a sheep farmer would think of this!) Enjoy!

Persian Lamb and Rhubarb Stew

3 Tbsp olive oil
1 large onion
4 cloves garlic
1 tsp coriander
1 tsp cumin
½ tsp cinnamon
1 tsp ginger
¼ tsp nutmeg
salt and freshly ground pepper
1 to 2 pounds lamb shoulder – bone-in
    (lamb stew meat can be used although the bones will add more flavor)
1 Tbsp tomato paste or a small can (14 oz.) Italian tomatoes
1 pound rhubarb – cut into 1 inch pieces with stringy bits removed if the skins are very thick
1/2 cup raisins (preferably golden)
2 Tbsp sugar
¼ cup minced mint or parsley or a mix of the two – whatever is easier – for garnish

In a dutch oven, brown the onion and garlic until onions are translucent in 2 Tbsp olive oil. Add the coriander, cumin, cinnamon, ginger and nutmeg and cook until spices begin to smell lovely. If it begins to stick, add a little bit of water to create a bit of a sauce. Set aside onion mixture.

Add 1 Tbsp olive oil to pan. Brown the lamb on all sides. Remove lamb from pan. Clean excess fat out of pan. Return the onions, spice mixture and lamb to the dutch oven. Add the tomato paste (or tomatoes), salt and pepper and add water (or lamb stock) to the pot so that it is half the way up the lamb shoulder.

Bring to a boil on top of stove. Cover with a tight fitting lid and place in a 250 degree oven and cook for 3 hours, turning the shoulder roast half way through. Alternately, cook in a slow cooker for 5 hours on low.

At the end of the three hours, remove the meat from the pot and pull the bones out of it. If the meat is not falling off the bones, return to the oven for another hour. (Save the bones for lamb stock. Store them in the freezer if you don’t have time to make the stock just yet.) With your hands, shred the meat which should be falling apart into chunks. Add the sliced rhubarb, the chunks of cooked meat, the golden raisins and the sugar back to the pot. Bring to a boil on the top of the stove and immediately return to the oven and cook another hour.

Remove from oven and taste for spices. Add more if you want a more intense flavor. If the flavor is too sour, add a touch more sugar. If the stew is too saucy, simmer with the lid off to reduce the stock. 

This stew really does improve if it sits in the fridge for a couple of days. Serve over basmati rice, couscous, or rice pilaf garnished with the parsley and mint. A green salad would be nice with it.


Friday, May 10, 2019

Garden Excursion to Garden Vision Epimediums

Epimediums - what a mouthful, isn't it? I want to share with you all a new garden plant - at least to me. Epimediums are shade loving plants that are native to China and Japan. I was introduced to them by my friend Kay. The other day we went on an adventure to Garden Vision Epimediums in Phillipston, Massachusetts - about an hour from where we live. 


My friend Kay is an amazing gardener. She has gardened all her life and is a plant nerd who knows all the latin names of plants. She is way beyond me - but I always learn something when she talks plants - which is good for me. She invited me to go to Garden Vision Epimediums after she heard the owner - Karen Perkins - on Margaret Roach's podcast A Way to Garden. You can listen here. BTW, Margaret Roach's book A Way to Garden is celebrating its 21st anniversary and has been updated and re-published on April 30th. 


The nursery is run solely by Karen. She has Open Days for 3 weeks in the spring. If you are local - you can still catch this year's Open Days until May 19th. Hours are 10-4. Please be warned - the nursery is located in very rural Massachusetts and there are no bathroom facilities


Karen propagates over 170 different epimediums and also sells them through mail-order. She travels a lot up and down the East Coast so if you can't get to Phillipston, you might be able to see her at a plant sale or lecture near you. Here is the schedule.


I was a total neophyte to this genus of plants but the more I looked, the more I was taken with the varieties. There are small ones, big ones, ones with multi-colored leaves. They come in many different leaf colors and blossom colors. They blossom in the spring and have the most delicate complex blossom. All of Karen's varieties were collected overseas and brought back to the US to be propogated.


Karen is doing important work and takes it very seriously. She works by herself, publishes a catalog, ships the plants all over the USA, cares for the nursery, does lectures and on and on. It was so nice to meet her and see her place.


I purchased a couple different varieties of epimediums and will put them in my shade garden next to hostas as Karen suggested. I hope I don't lose them to some critter of mine. It isn't easy gardening with 2 giant dogs, 1 medium dog and lots of cats and sheep but I am going to give them a try. Thanks to Kay for taking me on a plant adventure. 

Have a great day everyone. 

Monday, September 17, 2018

Making Lemonade out of Lemons in the Garden

A couple years ago, when I was working on my last book, I had a big oooooopsy with a small pot of paint -- spilling a big stripe down the outside of the shed. You might remember it. I tried to correct the color and because the shed was painted with a stain many years ago, I couldn't quite get the stripe right. I guess I could have but I had other things to do and knew that for the photo in the book, there was always Photoshop! 


This year, as I was planning my garden, I thought about how I could cover up that unsightly stripe. I decided to grow morning glories as they make a nice vertical carpet of flowers and leaves. I planted a piece of woven wire next to the shed and then stuck in some multi colored morning glories. And then I waited. 


Here is what the shed looks like now with the morning glories. I love it. I planned to put a string up to the top of the roof so they went totally crazy but never got to it. Maybe next year. 


Here is an overall shot of the veggie/flower garden in its wild, end of season state. I love all the haphazardness of the plants and blooms falling every which way.


Here are some of the flowers I grew - for bouquets and just for color and their beauty. 


I follow the Floret Flower Blog and watched some videos early in the year that suggested pinching back various plants. She suggested pinching celosia, zinnias, amaranth, snapdragons and cosmos. I decided to take her advice. I can't say I will do it again though. The zinnias did okay and branched out beautifully after an application of Azomite. I have 12 cosmos plants that are huge but only 2 have flowers. Lots of greenery but no flowers. The celosia were set back big time by the pinching and now are just taking off. The snapdragons are a mess - I think that is because of all the moisture and rain. I don't know if I will grow them again. So next year I think I will only pinch the zinnias and just let the others go. 

On a good note - I grew butternut squash and have a bumper crop. Our summer squash and zucchini plants fed us nightly for at least a month and a half. 

I guess the failure of each garden is part of the fun and what keeps gardening interesting. What do you think? I know the weather and the soil has so much to do with it but then there's what you do to the plants. I always start my garden so late but that's what I like to do. I am never too anxious to put stuff in the ground because of frost and because of things I have going on. 

If you are a gardener and have the time, share what were your successes or failures this year in the comments. Pretty soon it will be all over and we will be waiting to begin again. 

Tuesday, May 24, 2016

A Sunflower Garden Planting Guide

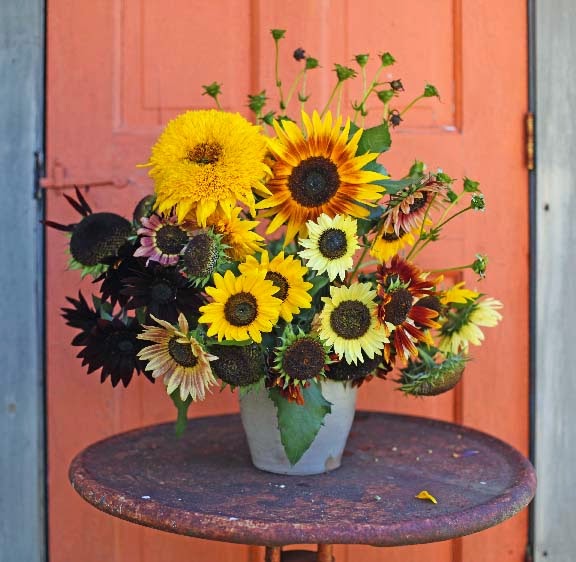
A bouquet from last summer
Flowers include Autumn Beauty, Sungold, Stella Gold,
Greenburst, and Moulin Rouge
I'm just getting around to thinking about my garden this year. I'm a late gardener - putting in my garden in mid-June. I thought some of you might be interested in planting sunflowers in your garden this year. I am sharing this Sunflower Garden Planting Guide for any of you interested in growing sunflowers in your garden. It was originally posted in April of 2015 but all of the information is still accurate. Enjoy all you sunflower lovers and growers! I can't wait to see these pretty blooms again in late August. 

If you have followed me for any length of time, you know I grow sunflowers every summer. I heard from Melissa, a childhood friend of mine who follows my blog. She asked for a list of my favorite varieties of sunflowers. I think there may be more of you out there who might like to plant sunflowers this summer so I put this Sunflower Growing Guide together for all of my readers. Please share this post with your fellow gardening friends! FYI - I grow in western Massachusetts. All photos by me taken either at our Farmhouse Garden or at our Sunflower Field (from a few years ago). 

First off - there are two companies I buy seeds from. My longtime supplier has been Johnny's Selected Seeds in Maine. They ship amazingly quickly from Maine. No minimums and they have some mixed variety packs for those of you with small gardens. 


My second supplier (a recent find) is SunflowerSelections  in California. I heard about them through this NY Times article. I have purchased from them since 2012 and have nothing but good things to say about the company, service and the varieties they offer. SunflowerSelections is actually a subsidiary of NuFlowers, a breeder of sunflower varieties. The only downfall is their packs are 100 seeds and there is a $15.00 minimum.  Their website is set up to sort by colors, branching, single stem, and more. 


So here are some of my thoughts about growing sunflowers. This is what I have learned from many years of growing them. 

1.You need sun! Shade doesn't work for them and long days of sun will yield much better flowers.
2. Although you can plant sunflowers early in the season, I wait until the middle to end of June to plant. This will give me flowers through frost. I have planted as late as the beginning of August and still gotten flowers - they are smaller because of the shortening days at that time of year. 
3. There are two kinds of sunflowers - Branching (many flowers per plant) and Single Stem (one flower per plant). I prefer the branching sunflowers to the single varieties (ProCut, Sunbright, and Sunrich strains). You get more sunflower blossoms per seed and they have a wild and unruly appearance which really appeals to me. 
4. Florists and growers usually plant the single varieties because they are reliable, are sturdy, and ship well. For the home gardener (me) they are a bit of a disappointment because they take up room and I only get one flower per stem. That said - they are very quick to bloom so I usually plant some so I get flowers quickly. 
5. Once my plants are about 8 inches tall, I mulch the heck out of them to hold the water in the soil and keep the weeds down. Once they get going, they grow like crazy and shade out most of the weeds. 
6. I don't fertilize my sunflowers. I have basic garden soil and the mulch from the previous year gets tilled in. I do add manure from my chickens and the sheep though every other year or so. 
7. Don't crowd the sunflowers. If you do, they will be stunted and not thrive. I plant about 2 to 3 seeds every 12" or so. That gives me insurance in case the birds or mice eat the seeds. 
8. Sunflowers tend to not transplant well. Plant them where you want them and be patient. They will grow as long as they have sun.  
9. There are dwarf varieties of sunflowers available but I don't grow them. I did once and they just didn't seem right. I am fortunate to have lots of sun and space but if you are tight on space, check out these selections via SunflowerSelections. 
10. Most of the branching sunflowers have one very large top flower. If you pinch (or harvest) the top flower, the lower branches will grow longer stems and the flowers will be bigger.
11. If you are looking to grow the giant sunflowers for bird seed, I do suggest you plant them as early as possible. They need a long time to grow huge and win any contests. If you plant them later, they will be shorter and the heads will be smaller. I like the variety called Mammoth Russian available from Burpee

Here are the Sunflower varieties I highly recommend with links to each supplier who stocks the seeds. I have described why I enjoy each of the varieties. Don't wait to order your seeds because they often run out of popular varieties. The variety is BELOW each photo. 


Both photos - Autumn Beauty
Autumn Beauty - Branching. This sunflower is long season and needs a while to bloom. It gets very tall. Order seeds early as they are often sold out. This is Mark's favorite sunflower. The plants get huge and send out tons and tons of flowers. There is a wide range of colors - light yellow, light yellow with pink tinged centers, dark brown, rust, red, maroon, bronze, and classic sunflower yellow. If we had to choose one sunflower to grow, this would probably be it because you get such a variety of colors. Has pollen for those averse to it. 
Johnnys


Moulin Rouge Sunflower
Moulin Rouge - Branching. This is a gorgeous wine colored sunflower that looks lovely in bouquets. It is one of the earlier sunflowers to bloom. When we grew sunflowers in our field on the main road, this was a favorite of many of our customers. It doesn't ship well so that is why you probably have never seen one in a florist's bouquet. (FYI - SunflowerSelections has a new red branching variety called Black Beauty that I am trying this year to compare to Moulin Rouge.)
Johnnys
SunflowerSelections
Joker Sunflower

Joker - Branching. I love this multi-colored sunflower. It is one of the first to bloom. The center is edged with a fringe of teeny petals. The outer petals are long. Once in a while, there will be a plant that has different looking blooms on each branch. It lasts a long time in a vase and is quite sturdy. Not too tall but definitely not short. 

SunflowerSelections


Orange Ruffles Sunflower

Orange Ruffles - Branching. This sunflower was new to me last year and it rocked! Similar to The Joker and Greenburst, it has a brown center with a fringe of mini yellow petals. Seriously gorgeous. 

SunflowerSelections


Greenburst Sunflower - Top Flower

Small Greenburst Bloom from one of the bottom branches

Greenburst - Branching. This sunflower was new to me last year and I am in love! Reminiscent of Sungold, it has a tight chartreuse center surrounded by hundreds of tiny petals. The outer edge of the flower has slim long petals. The top bloom is big (8") if you let it grow. If you cut it off early, the smaller lower branches will produce bigger pretty (although smaller) blooms. Long vase life. 

Johnnys
SunflowerSelections


Sunbright Sunflower

Sunbright - A single stem variety that is the classic sunflower. Quick to bloom. I always plant these so I have big blooms quickly. This variety is often grown commercially as is the Pro-Cut varieties which I am not highlighting here in this Planting Guide. 

Johnnys

American Giant Sunflower

American Giant - This is the classic GIANT sunflower. One giant head per stem. These plants are like small trees by the end of the season. It is best to give them lots and lots of room to grow. They will shade out other plants so if you have a spot, away from your regular garden that has good sun - plant a few there for fun. You will have a giant seed head to feed to the birds. You could also plant a "sunflower house" for your kids and grandkids. 

Sungold Sunflower

Sungold - Branching. You need to have a long growing season for this gorgeous, puffy sunflower. They are always the last to bloom in my garden and I usually plant them first! The top flower will be the largest. Once you cut the top flower (usually 10" across) with its short stem, the lower flowers will grow with longer stems. A few years, the frost got mine before they bloomed, so plant them first! 

Holiday Sunflower
Holiday Sunflower backed by Autumn Beauty

Holiday - I love this sunflower for its vigorous nature. You will get so many blooms off each plant. The blooms are not very big - about 5" or so. It does drop a lot of pollen (for those of you who are clean freaks). The blooms develop in the vase nicely. 

Johnnys


Golden Cheer Sunflower
Golden Cheer - Branching. This variety was new to me last year. It is similar to Greenburst with a larger green center. It has a frilly textured edge to the center. Gorgeous. I plan on growing it again this year. 

Stella Gold Sunflower
Stella Gold - Single. This is a quick growing sunflower with extremely long petals. I grew it for many years and then couldn't find the source of seeds until I discovered SunflowerSelections. Funny thing is years ago when I grew it, the centers were rather mis-shapen - almost oval in shape. I loved that. The seeds from SS are a bit more perfect. I miss the wonkiness but love the very long spider like petals. 
SunflowerSelections 


Above is a mixed bouquet from last summer. Flowers included are: Autumn Beauty, Moulin Rouge, Greenburst. I like mixing in some of the over mature "done" sunflowers for interest. 


I hope you will try to grow some sunflowers this summer in your garden or along the edge of your yard. 

Thursday, September 10, 2015

How I Make Lacto-Fermented Pickles - An Easy and Very Tasty Recipe

Last summer, I experimented with making lacto-fermented pickles. These are the type of kosher dill pickles that you often find in New York delis. It reminded me of a giant science experiment with the result being a huge jar of incredibly delicious Garlic Dill Pickles. My family loved them so much that they didn't last long. This summer I have been making them again so I thought I would share how I do it. 

This is a great recipe to do with kids because it is super easy, there is no stove or heating needed, and watching the pickles ferment in a glass jar is a whole bunch of fun. As they ferment, the color of the water changes, bubbles come and go, the dill and mustard seeds float around. By the end of the fermentation, you won't believe how delicious they are. 

Finding the large jars is the hardest part. I'm always on the lookout at yard sales. These are nice and available from Crate and Barrel. The lids can be taken off while the pickles are fermenting and then used to close them in the fridge. (They are also good for making sauerkraut. You can also find very large Ball jars at many stores at this time of year. 

Lacto-Fermented Garlic Dill Pickles

You will need a half gallon jar. For each jar, you will also need a smaller jar with a lid that will be filled with water. The small jar needs to fit inside the larger jar. You will also need a towel to cover up the jar while it is fermenting. 

Enough pickling cucumbers to fill the jar - about 3 to 4 pounds
2 quarts of water
6 Tablespoons of kosher salt
10 cloves of peeled garlic
2 Tablespoons dill seed
1 Tablespoon yellow mustard seed
1 teaspoon celery seed
1 oak leaf or grape leaf (optional - I never use them)

Wash your jar so it is nice and clean. Wash your cucumbers so they are free of any dirt. 


Cut off the blossom end of each cucumber. You can tell the blossom end because it is usually rounder than the stem end. 


Place your spices in the jar. 


Add the garlic cloves and the optional leaf. 


Fill your jar with the cucumbers. This is the fun part - seeing how many you can squeeze into the jar. Optimally, you will want the cukes to be about an inch below the rim of the jar. 


Add the salt to the water and stir until it dissolves. Place your jar where you will be letting it ferment. Pour the salty water over the cucumbers until they are submerged. 

Fill the small jar with water and close it with a lid. Place the jar on top of the cucumbers so they will be submerged. The filled jar keeps the cukes from floating. 


I had extra cukes so I made some more in some smaller jars. Here they are set up to ferment. This is taken about 12 hours after they began fermenting. 


Cover your filled jar with a tea towel and wait. Here are my pickles under their shrouds. 


The next day, your cucumbers will begin looking different. You will see bubbles rising to the top of the jar. Here is a close-up of my pickles after about 12 hours. You can see the bubbles and the seeds rising.


Depending on the temperature of your home, the pickles will be done in from 5 days to 2 weeks. Scum may develop on the top of the jar and you can skim it off. In the heat of the summer, the pickles ferment much quicker. 

I usually begin tasting them on the 5th day. I slice off a small piece of the top cuke and see if it is done. If it is tasting good, I slice the pickle in half to make sure it is totally fermented. If you think they need more flavor, let them keep fermenting. If a scum forms around the fermenting cuke, just wash it off. It isn't harmful. The liquid will be cloudy - don't be grossed out by it. It is full of good stuff for you like probiotics and other good cultures. 

When mine are done, I move them to the refrigerator where they crisp up. They keep for up to 6 months or longer but honestly, they never last that long here at our farm!  You can distribute them amongst smaller jars - just pack the brine and the spices in with the pickles. Do not hot pack them though. No need to - they will keep and if you did, it will ruin them. 

Feel free to change up the spices and play with the recipe. Don't like garlic? Leave it out. Like things spicy? Add a hot pepper. Fermenting is a lot of fun to experiment with. 

Give it a go this weekend and let me know what you think! 

Kristin Is Now Writing Over on Substack

Hi All! A quick note to let you all know that I'm now writing a Newsletter over on Substack: Kristin Nicholas' Colorful Newsletter f...