 I love a separating zipper in sweater to make it feel more like a jacket. They're also great in children's sweaters like the photo at left taken by Chris Hartlove for Interweave Knits. Once you have mastered putting one in once, you’ll turn again and again to this technique. A month or so ago, I promised a lesson so that when you finished this adult sweater from the Fall 2006 Issue and this child's sweater (shown left) from the pages of the spring 2006 issue of Interweave Knits, you wouldn’t be afraid to really finish it.
Unfortunately, separating zippers don’t come in as many colors as regular zippers. I always make a run to the fabric store before deciding on the color of the yarn I am going to use. I want my zipper to match the sweater (although you could do something completely fun and have a contrasting zipper). You can always feel pretty safe with navy, black, dark brown and red – these colors are normal outerwear colors and separating zippers sold in fabric stores are usually sold to replace broken ones store-bought outerwear. (….unless people don’t do that anymore – they just throw the coats away – I digress….)
 Finish the entire sweater, including weaving in ends, washing and blocking. I REPEAT, INCLUDING WASHING AND BLOCKING! Measure the opening and purchase a zipper. Do not purchase a zipper any shorter than the opening – if anything 4 or 5 inches long is better.
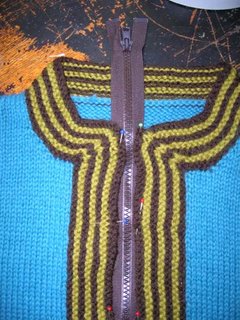
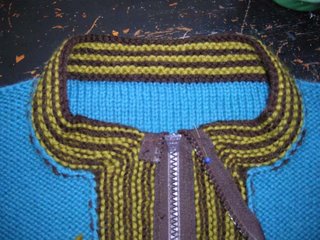
Lay down the finished sweater on a flat surface. Lay the zipper between the two open edges. With straight sewing pins, pin the sweater at the top and the bottom of the zipper on both sides. The top of the zipper may extend beyond the sweater pieces – that’s okay. Do not stretch the knitted edge as you are pinning or the edge of the sweater will flare and be longer at the zipper insertion point than around the rest of the sweater – a totally unsightly problem - if I may say so. Pin along the sides of the zipper so that the edges are about 3/8” away from the center of the zipper teeth.
 Using a sewing needle and a single strand of matching sewing thread (to the yarn, not the zipper if you are inserting a contrast color zipper), beginning at the bottom edge, sew the zipper by hand using backstitch. Many separating zippers begin with a plastic tab which is difficult to stitch through but not impossible. A thimble can be helpful. As you go, stitch over the individual yarn and stitches to anchor them in place. Remove the pins as you go. The backside of your sewing (the zipper side) will not look neat – don’t worry. The idea is to have your zipper securely attached to the knitted fabric. You’ll notice that the sewing stitches disappear into the knitted fabric. Keep stitching the zipper so the knitted opening is an even distance from the zipper teeth. Continue until you are at the top of the zipper but do not worry about the length of the zipper just yet.
Finish the other side the same. Now turn the sweater inside out.
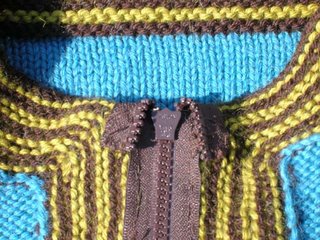
 Unzip the zipper until it is at the tippy top of the sweater opening (where it should end). Turn down the top of the zipper so that the zipper tails form a slight angle away from the pull. Pin in place.
Using a single strand of matching sewing thread, tack down each zipper tail neatly until you have attached about 1” of the zipper to the back of the sweater/zipper. Snip off the zipper leaving about it 1” long. Continue to tack around all edges of the zipper. This will keep the pull on the zipper track.
 You did it. Eat your heart out Mr. Rodgers!
P.S. If you have found this tutorial helpful, please spread the word. I'd love some more traffic on this blog! Thanks - KN


21 comments:
Thank you so much for this tutorial! I have an unfinished sweater that has just been sitting around waiting for this!
Wow, thank you so much for sharing this technique! I have waited to start a sweater pattern because I was nervous about sewing in a zipper. Now you have inspired me to dive in :)
Perfect! I've designed a man's sweater vest and really want to finish it with a zipper myself rather thatn trust it to the local yarn store's "finisher". You've answered a prayer. Thank you for sharing.
Thanks so much! I was trying to decide if I wanted to finish a sweater off with a zipper or leave it as a cardigan. Now I think that I'll cut it open and slip in a zipper. Will you hold my hand? No, that wouldn't work very well, would it, with the needle and all..heh.
Thanks for the tutorial. Seems a lot less intimidating now.
Martha
If you go to Zipper Source, you can get just about any type zipper, in any length, and a multitude of colors.
PJ
Your tutorial is very helpful! If you're not satisfied with what the local fabric store has in stock, you can get custom length/color zippers on line at www.zippersource.com.
Thank you very much! I always find putting in a zipper so intimidating. This really helps me.
Oh yes, it IS helpful! So thank you! Even though I don't need to put in a zipper anywhere right now, i'll come back to it when the need arises. I think it's generally very helpful to show in detail how to finish things which is for me often a main obstacle in starting a project in the first place.
Great tutorial! Thanks! :)
I could have really used this last month when I was putting the zipper in my sweater jacket. I managed but the top treatment you use is much better than what I ended up doing.
Thanks!
Great clear explanation! I sew for a living and I thought this was a very understandable lesson.
Do you ever extend the knit edges (or set back the zipper) at all so that it is covered? I wondered if that might have inherent problems due to the fuzziness of the yarn getting caught.
I have mentioned this blog before elsewhere, and will again. I love your work, your style and your writing.
Thanks for the tutorial. I read your blog regularly :-)
I might have missed it in your entry, but another thing I always do is soak the zipper first in warm water in case it wants to shrink at all
Fantastic! I just shared this link with the Dale Of Norway Yahoo list. Hopefully they will find it as useful as I. Love the sweater!
Thanks so much for taking the time and posting this. I love zippered sweaters but have cringed at the thought of inserting a zipper. This tutorial is clear and helpful. I will definitely be refering back to this and I will spread the word...
Thank-you for such a clear explanation with excellent photos (I need the visual!). Because of the zipper issue, I've hesitated buying the wool for the sweater I want to make. Now, it's back to my favorite place, the yarn shop!
ZipperConnection.com is also another source for all colors and lengths of zippers. If they don't have the length that you need, e-mail them and they'll shorten to the length you need - NO CHARGE!
Kristin,
This looks very tidy, but I'm concerned about scratchiness on that turned back zipper top. I always wear sweaters over shells or tank tops, so it seems that would scratch a bit. Any ideas?
I just finished sewing my zipper in & this helped me a lot! Thank you!
Thank you for the tutorial. I have just completed a knitted hoodie with a separating zipper and did exactly as you suggested. One additional point, you can blind stitch grosgrain ribbon over the zipper tape to add a coordinating or fun design element to your sweater. My grandmother always said to judge a garment by how it is finished on the inside!
I am almost finished with a sweater vest I am knitting and have never sewn in a zipper into a knitted item.So I was thinking in advance and saw your explanantion......thank you so much for your advice. I'm looking forward to trying this!
Post a Comment